How to Read Resistors: A Practical Guide

More from the Category
Resistors are fundamental components in electronic systems, acting as precise regulators of electric current. By providing resistance to the flow of electrons, they help maintain safe and stable circuit operation, protecting sensitive components from power surges and ensuring efficient energy distribution. Available in various types, such as fixed, variable, carbon film, metal film, and wirewound, resistors are designed to meet specific application needs, from consumer electronics to high-performance industrial systems. Their operation follows Ohm’s Law, which defines the relationship between voltage, current, and resistance, making them indispensable for controlling voltage levels, fine-tuning performance, and ensuring the reliability of both analog and digital circuits.
Learn More: Resistors - An In-Depth Guide to the Electrical Component
Whether you’re prototyping, repairing, or buying components, being able to read a resistor’s value quickly is essential. In this article, we’ll walk through how to read resistors efficiently, discuss the tools that make it easier, and provide tips to avoid common mistakes.
Resistor Color Code Basics

Resistors in most electronics projects use a standardized color code of three to six bands to indicate their value. Each colored band represents a number, multiplier, or tolerance, and together they tell you the resistance value, the tolerance, and sometimes the failure rate. This code is based on the International Electrotechnical Commission (IEC) 60062 standard and is a quick way to determine resistance without needing to pull out a multimeter.
Generally speaking, the first two (or three) bands on a resistor indicate significant figures, while the next band is the multiplier, and the final band specifies tolerance — except on 6 band resistors, where the final band is the failure rate. That said, it’s always a good idea to check the manufacturer’s documentation to ensure you are reading the bands properly. The most common resistors have four or five bands. Understanding these codes will allow you to easily read any resistor.
Standard Color-to-Number Mapping:

For example, a resistor with red, violet, and yellow bands would be read as 27 followed by a multiplier of 10^4, giving you a resistance value of 270,000 ohms (270kΩ).
You may also see Gold and Silver bands (or yellow and gray in high voltage applications), but they will always be on the right because they are never used for significant digits.
Steps for Reading Resistors
When you’re reading a resistor, the key is to interpret each color band correctly in sequence from left to right. Here’s how:
1. Orient the Resistor Correctly:
The first step is to ensure that you’re reading the resistor in the correct direction. Start from the end closest to the bands that are closer together — the tolerance band will usually be farther from the other bands. Also, gold and silver bands make orientation easy, since they are always on the right.
2. Read the Significant Digits:
Look at the first two (or three) bands to determine the significant digits. These are the most critical numbers, as they define the base value of the resistor.
3. Apply the Multiplier:
The third band (or the fourth on five and six-band resistors) represents the multiplier. Multiply the value derived from the significant digits by this multiplier to get the resistance in ohms.
4. Check the Tolerance:
Finally, the last band represents the tolerance, which tells you how much the actual value of the resistor may vary from the stated value.
Common tolerances are:

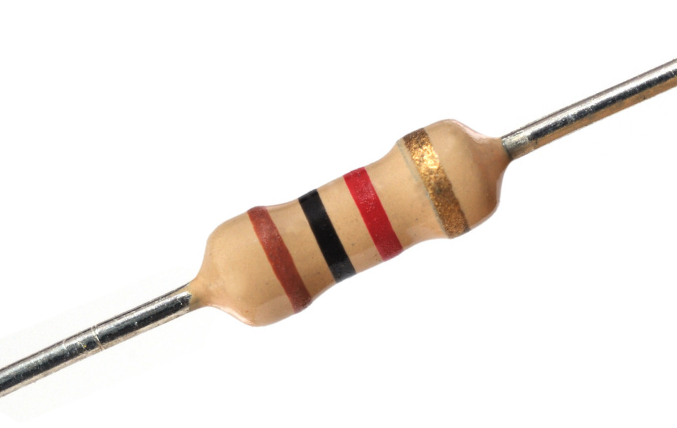
Example: A resistor with color bands of brown, black, red, and gold would be read as follows:

- Brown (1), Black (0) – giving 10 as the base value.
- Red multiplier (100) – making it 10 * 100 = 1,000Ω (1kΩ).
- Gold band – indicating a tolerance of ±5%, so the resistor value could be between 950Ω and 1,050Ω.
Tools to Simplify the Process
While it’s important to know how to read resistors manually, tools can simplify the process and reduce the chance of making an error.
A multimeter is the go-to tool for measuring resistance directly because it is quick, reliable, and doesn’t require memorizing the color code. Also, a multimeter is particularly helpful when you’re handling resistors with faded or hard-to-read color bands.
If you’re working in front of a computer, online tools like AllAboutCircuits’ Resistor Calculator can instantly calculate resistor values. For mobile solutions, apps like ElectroDroid offer resistor color code calculators, making it easy to identify resistor values on the go.
Common Mistakes and How to Avoid Them
Even seasoned professionals can make errors when reading resistors, especially when in a hurry. Here are a few common pitfalls and how to avoid them:
Misinterpreting Colors: Colors like red and orange or green and blue can look similar in poor lighting. Always check under good lighting conditions and, if possible, verify the value with a multimeter.
Reading in the Wrong Direction: If you start from the wrong end, you’ll get incorrect values. Remember, the tolerance band should be on the far right (or far left if you’re holding the resistor upside down).
Ignoring Temperature Coefficients: Some resistors, particularly precision resistors, have an additional band that indicates the temperature coefficient. Be sure to check the manufacturer’s documentation if you’re working with resistors in high-precision applications.
Reading Resistors with Confidence
Understanding how to read resistors is a basic but essential skill in electronics. By mastering the resistor color code and using tools to help verify your readings, you can ensure accuracy in your designs and troubleshooting.
If you’re in need of resistors or other electronic components for your next project, contact Microchip USA. We’re industry veterans and have supplied tens of millions of components to clients in a variety of industries, from medical and industrial projects, to telecommunications and green energy.
Whether you need help finding a specific electronic component or managing your supply chain, Microchip USA can help. Contact us today!


